Building A Wedding Chest

The Wedding Chest
When she was a kid, Maggie wanted a wedding chest….
The idea of the chest had its genesis when my daughter Maggie was a young girl and liked the wedding chest that my wife had handed down from her mother. It was a fairly non-descript wooden box – rabbeted corners and a plain straight lid of glued-up 2 inch pine boards. But it may not have qualified for the Woodworkers Guild award, but there was something magical about that chest. And Maggie wanted one. This article is about how I went about building a wedding chest.
The Dye is Cast
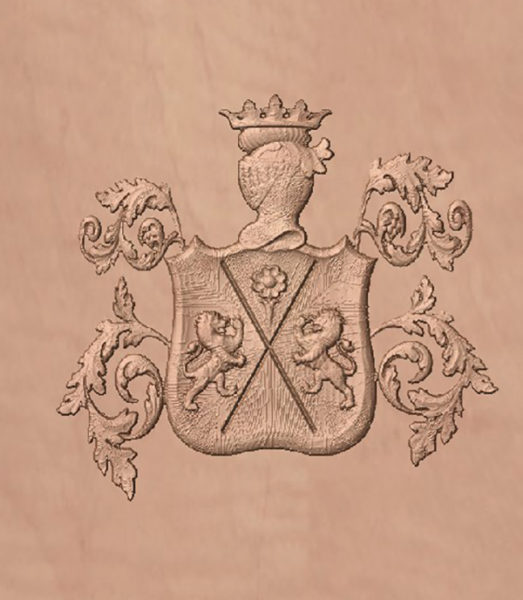
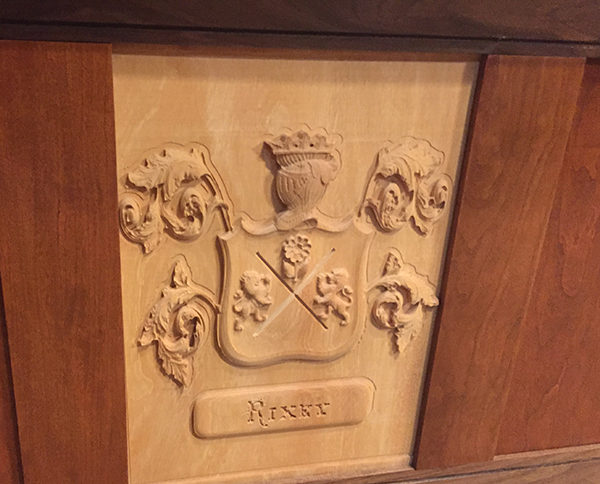
Fast forward twenty years. My Maggie was marrying into a family that had a string of unbroken male lineage and her husband-to-be’s name was Eppa Rixey V. (The Fifth, really?”) The Rixey family, as one can imagine with five continuous generations, had a family crest. Their crest is shown in the figure, below:
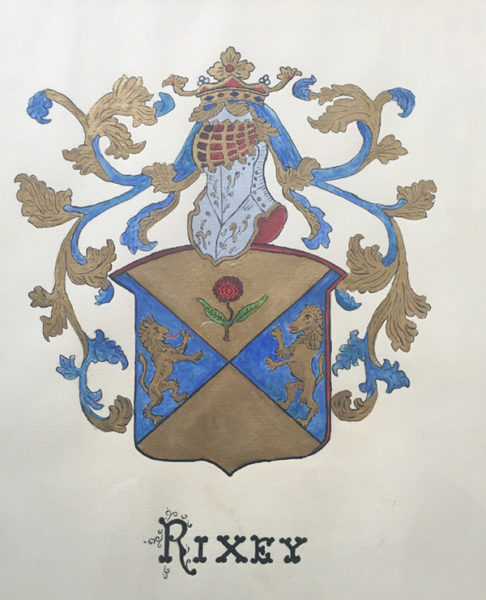
So I was formulating a plan. It took no time before I made up my mind to make a wedding chest that had the Rixey Family Crest on it. These two factors had converged to make the Wedding Chest design and build of the ultimate chest.
Meeting the Rixeys and the Gift Collaboration is Born
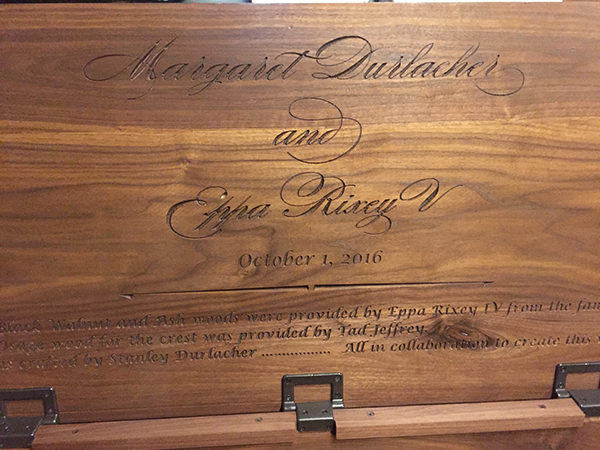
Eppa’s father and I had an “Ah-Ha” moment at the engagement party for Mag and Eppa V at their house in Cincinnati. Eppa IV and I hit it off and found out that we were both woodworking-kindred spirits. He had recently taken down a number of trees off of his land and had had the wood milled at a local lumber yard. We decided to collaborate on this gift. About six months later, we met up and I took delivery of a fabulous assortment of Cherry, Black Walnut and Ash woods. In addition, my Father-In-Law, also a woodworker, wanted to be in on the gift and he offered up a spectacular piece of Osage Orange which ultimately became the piece on which I carved the Rixey family crest.
The Chest Starts to Take Shape
As almost every project I undertake, I designed the chest in SketchUp Pro and sent the finished design around to show them what I intended to build. Everyone was on-board for the chest. The SketchUp rendering is below:

It is now early in April and the wedding in the first weekend in October. So I am getting a bit concerned with a couple hundred board feet of raw milled lumber and a SketchUp design in hand. But I had an ace in the hole to help me. My cnc router, known by my kids as La Machine.
La Machine to the rescue in fabricating the parts
In 2013, I designed and build my own CNC machine and have used it extensively in my woodworking. My main design software is SketchUp. My go-to part design software is Vectric VCarve Pro. I run Mach3 for the machine post processor.
I have enclosed a picture of the machine bed and the computer station. The machine bed can take a 36″ wide by 72″ long (and even longer if you want to have the material hang off the ends). I have a 9.5″ capacity in the Z axis. I also built a vertical bed on the end of the machine bed and I can do mortises and tenons on vertical boards. This end panel also allows me to fabricate through dovetails. All of the mortise joints on the wedding chest were fabricated on the end plate.


Since 2013, I have fabricated hundreds of items on La Machine, I am very pleased with the quality of the pieces I make with it and I have enclosed a picture of a cutting board I fabricated for a fund raiser, below:
(By the way, that fund raiser cutting board sold for over $700). I do a lot of this type of work on La Machine.
‘Better’ is the Worst Enemy of ‘Good’
The Rixey family crest was going to be an interesting challenge. I knew that I could always scan and reproduce the crest and carve it in 2D, similar look and feel as the cutting board, above. That approach would be almost trivial for me.
But I had been looking at the Design & Make and Vetric 3D sites for nearly two years and thought I might try to replicate the Rixey family crest in a 3D carving for the wedding chest. I had attempted a few small and simple 3D carvings with La Machine with files that I had downloaded from the Internet. And these files were complete designs that I could convert directly to the machine processor and cut without any direct involvement.
But I had not tried to assemble the designs and fabricate any 3D carvings from a clean sheet of paper. It is now July and ‘Better’ has won out.
I turned to the Design & Make website to find the elements that make up the Rixey family crest. My shopping list included the shield, the helmet with a gridded visor, a few flourishes, the heraldic lions, and a flower…Thankfully, all of the main crest items were featured on the Vectric and Design and Make and ended up in my shopping cart. I suppose with enough time, I could have figured out how to design/make a shield that was closer to the original, but I had a hard stop deadline of the wedding day in less than eight weeks!
Thanking Al Gore for inventing the Internet
I watched hours of tutorials and I figured out how to get the elements assembled into a viable carving file. It even looked good and was a reasonable facsimile of the Rixey Crest. The rendering, produced in VCarve Pro looked pretty good!
Rounding Third Base and Heading for Home Plate (The Wedding)
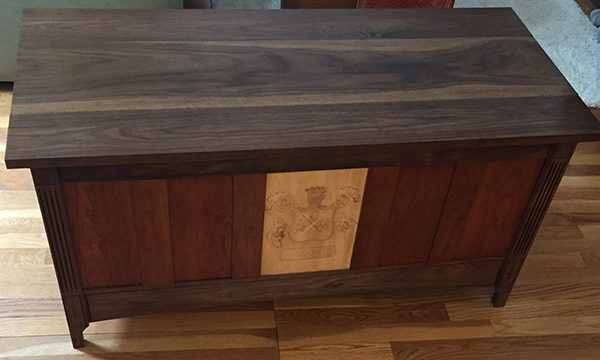
The chest, itself came together nicely. It is a pretty standard panel and frame type of construction. My DeWalt 735DW planer and my Inca 6” jointer got quite a work out creating the finished lumber from the mill stock. The 13″ width of the planer came to good use thinning down the wide wooden slabs.
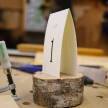
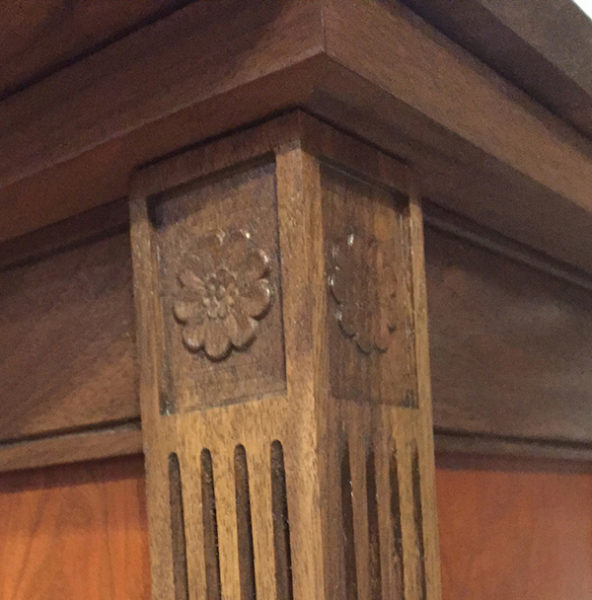
I have to say that ‘Better’ did raise its ugly head a number of places in the final chest. The legs have flutes and initials carved for the bride and groom’s parents. I could not resist but put a flower carving in the capital of each leg. (Yes, it is the same flower piece, less the stem, as the crest. That is one of the beauties of cnc technology.)
Enclosed are a couple of images of ‘Better’ showing through.

Building a 3D Crest for the Wedding Chest
Of course, everything did not go as smoothly as planned. I had an issue when I first attempted to carve the 3D crest. I did several crest carvings in cheap wood to make sure the piece had all of the bugs worked out before strapping my only piece of Osage Orange onto the cnc bed. It looked like an army of woodpeckers tried to make the part. See what I mean?
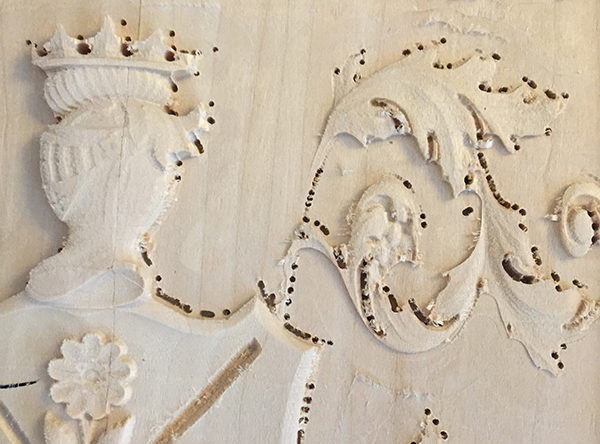
But Al Gore came through once again! Reading through the various Vectric forums and having used VCarve Pro for nearly 4 years and hundreds of projects, I figured out how to make a very slight transition between the vertical portion of the carving and the background field. This allowed the Vectric software to create the code for the carving process – without the holes. Designing in a .01” fillet between the vertical portion of the crest and the horizontal face did the trick. Just enough to let La Machine know what to do with a 1/32” bull nose bit at that junction.
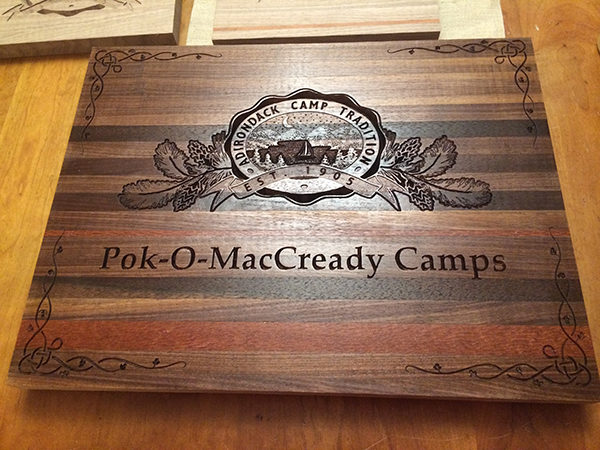
The final carving was great and I was very pleased. I finished up the chest and got ready for the wedding. The final three pictures tell it all.
The Final Thoughts
It is not often that what you love to do means so much to the ones you love. In this case, Mag got her Wedding Chest. Eppa, Tad and I all were a part of a piece of furniture that will become the Heirloom of Mag and Eppa’s family. I can’t wait to hear the stories about which of their Grandkid fights the hardest to get it.
When Maggie was a kid, she always wanted a wedding chest, now she has a magical and storied wedding chest of her own!