Installing Snow Melting Cables Under A Walkway

 Slippery Walkways are Dangerous: Install A Snow Melting System

In the Northeast winter means shoveling and salting your walkway and stairs. The problem is salt destroys stonework and black ice can cause falls.
One bad fall can result in a broken hip, leg or cause you to throw your back out. Heating a driveway or walkway is a great way to get rid of snow melt chemicals and to ensure that your driveway or walkway is always clear and less likely to cause a slip and fall injury.
This is article is part one of a two part series on my experience installing a snow melting system under a new blue stone walkway and blue stone step and landing. The system is manufactured by a company called Warmly Yours.
Snow Melting System:
WarmlyYours designs durable, high quality indoor and outdoor snow melt and heating products. Their heating cables are designed for concrete slab floors of new homes, outdoor driveways, walkways, stairs and patios. The product is well suited for large areas like basements, garages, additions and driveways.
Types Of Snow Melt systems:

Best Time To Install:
The best time for this type of installation would be during a new home project, or major landscaping changes to the property. If old, cracked walkways and driveways need replacing, then would be the time for this type of installation.
The folks at WarmlyYours recently send me a complete Premium snow melting system to evaluate and install on a recent front walk and stone step project. The system they sent me was designed for my project and came complete with all of the cable, controllers and snow sensor needed for a quality snow melting system. In this article I will discuss what was involved in the installation of this product as well as provide you feedback on my experience.
Installing A Snow Melting System In a Walkway:
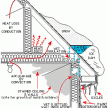
Warmly Yours works with you to design a custom fitted system for snow melting systems to heating walkways, stairs, patios or driveways. They have both mat and cable snow melting systems, which can be installed under asphalt, concrete or paver application. The cables heat the stone in the walkway to a temperature above freezing which melts the snow.
I found dealing with my customer representative, Matt Caruso, easy and informative. Every call I placed to Matt was either answered immediately or promptly returned. Warmly Yours recieves an “A” for customer service.
Product Specifications:
The Warmly Yours snow melt system that I was using was designed to be installed in asphalt, concrete, or in mortar under pavers and comes in specifically designed lengths. This project used 251′ of cable spaced approximately 3″ apart. The system is a 3000 watt, 240 volt, 12.5 amp system.
Warmly Yours sent me the following as part of the premium system sent me:
- 251′ of snow melt heat cable
- Relay panel
- Premium snow melt control panel

- Snow sensor

The product is CSA Certified for outdoor use in Canada and US and is offered in 120V or 240V configurations.
The Heating Cable is comprised of a dual, multi strand heating element with a primary insulation of Fluoropolymer. The insulated core is protected with a woven metalbraid and an outer jacket of PVC, EPR or Zero Halogen Polyolefin based compound to make it sturdier and to provide corrosion protection.
These cables are terminated with 20’ (6.1m) long standard cold leads. the cold lead is obviously not heated and is used to enter into the building and attach to the control panel. The hot and cold junction is uniquely designed to make it 100% fool proof.
The Snow Melting system can be installed as a mat consists of the heating cable taped on a polypropylene (PP) mat or as a heating cable is laid in a serpentine fashion so that it is equally spaced and distributed on a metal grill or screen.
The snow melting cable is available in a wide range of capacities and sizes to suit your requirements. Before starting my project I gave my customer service representative my exact project dimensions and they provided me with a custom detailed installation drawing.
Electrical Requirements:
To install this system the electrician needed to install 1 – 20 amp. 240 VAC breaker and 1-15 amp. 120 VAC breaker. For better electrical efficiency I wired my project for 24o volts.
Warmly Yours Snow Melting Cables:The cables are embedded about 2” to 3” below the finished concrete or sand surface. The radiant heating experts at WarmlyYours offer a customized plan based on each customer’s unique project.

Mat Slab Heating Specs:
For normal concrete slab floors and mortar under pavers, WarmlyYours Floor Heating for Concrete mats range in length from 11 to 563 feet and in width from 1.5 feet to 3 feet. Quick and easy to install, the mats generate 20 watts per square foot (215 watts per square meter).
Cable Slab Heating Specs:
Ideal for oddly-shaped areas that include curved or diagonal walls, WarmlyYours Floor Heating for Concrete cables are available in lengths ranging from 57-563 feet.
The energy-efficient twin-conductor heating cables generate 6 watts per lineal foot (20 watts per meter). Typical spacing is 3.5” to 5” on center. We chose the cables on this installation because of the transitions involved going from the landing to the step and then down to the walkway.
Preparing The Jobsite:
1. Remove and dispose of the old wood steps and landing.
2. Remove trim and siding on the house and install rubber and copper flashing as a flashing layer between the house and the new masonry landing and step.
3. We dug all loam out of the landing area to a depth of 24″. I used the two existing 10″ by 48″ deep concrete footings as part of my landing footing.
We drilled #8 re-bar into these footing and into the brick wall of the house foundation. We also connected the rebar with perpendicular re-bar to make a grid. Once this was complete we formed the landing and step pad , added more re-bar and then poured the entire thing.
4. We installed scaffold pipe staging and a tarp top make a tent. Using a torpedo heater we heated this area for the entire day and eight hours into the night to keep the concrete warm during the curing process.
5. The old cobblestones were removed and we made sure there was a good solid base for the new walkway. We placed 4″ of gra vel and 1″ of sand on top, leveling and compacting with a plate compactor. It is important to pack the base to eliminate stone shifting.
6. The blue stone will take up the remaining 2″ of your base. Blue stone is usually laid in a pattern and we used a running bond pattern. [similar to a brick wall] Many customers like to create their own patterns. Full pieces should be laid first and all cut pieces last.
7. Blue stone joints were filled with a colored plyometric sand.
Instructions Prior To Installing The Cable:
We chose to build a concrete block landing and step and use a veneer stone to cover the sides of the landing and step risers. We felt the cable would be easier to install with a block foundation. Originally we had planned on building a true field stone base and step but scrapped the idea early on.
The top of the step and landing would receive 1-1/2″ thick blue stone treads with mitered corners and a large center slab. All of the blue stone would be set in 1 to 1-1/2″ of mortar.
Installing Snow Melting Cables:
1. The Warmy yours heating cable has a 20′ section of cold wire. This wire is what you use to run through the house wall and to the control panel. I drilled two holes into the house sill wall and installed two metal conduits. One conduit pipe contained the systems slab temperature sensor and the other contained the cold wire which connects to the controller.

It’s important to note that the black section of the wire [cold wire] can be cut to any length but the green section [heated cable] can not be cut.
It’s also important to make sure you lay out your cable to avoid other heat sources such as luminaries and chimneys.
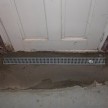
2. I installed the cable at a depth so that it would not be deeper than 2 1/2″ from the top of bluestone. The snow melting heating cable rests in a 1″ bed of mortar we installed galvanized stucco type mesh to the landing and step with tap-con screws.
Allow sufficient drying or curing period of the floor / slab / concrete / asphalt after installing the Heating System and before energizing the Heating System
3. The heating cable was then installed in a serpentine pattern, and was secured to the mesh with plastic tie wraps. I took precautions not to overlap the cables at any point to avoid possibly overheating the cables. Minimum spacing of the cable s 3″ and the maximum spacing is 12“.
Note – Minimum bending radius of the Snow Melting Cable should not be less than 10 times its diameter.
4. In order to transition from the landing to the step and then to the walkway I used a grinder and diamond blade to cut off the corner of the concrete block. The stone veneer comes with corner blocks that cover all of the corners. By removing the concrete block corner I was able to create a channel for the snow melt cable to run through.
5. I ran the walkway in a similar serpentine pattern as I did on the landing and step.
6. During this project it’s super important to take precautions to avoid damage to Heating Cable during installation.
There are alot of Do Nots:
- Do not drive over cable.
- Duct tape the ends of shovels.
- Do NOT saw expansion joints,without having lines marked off clearly with spray paint, where installer has verified that H
 eating Cables will not be cut.
 - Do NOT damage Cables with heavy equipment, machinery or vehicles.

7. A qualified electrician should connect the Snow Melt Heating System and must be able to check the continuity, resistance and insulation resistance of the Heating Cable before installing and also after installing. Resistance value should match the value shown in Appendix A on page 12. A tolerance of -5% to +10% is allowed. Insulation resistance must be more than 10 megohms.
8. For installations in stairs and ramps that will include hand rails, it is strongly recommended that the paver installer pre-sleeve for the posts to avoid any and all drilling of the mortar. The Heating Cable must be routed around these sleeves or posts to avoid any direct contact with them. It is the responsibility of the electrician and the paver installer to coordinate their efforts so they avoid saw-cutting or drilling through Heating Cables that are no longer visible beneath the mortar.
9. It is extremely important that the blue stone installer does NOT use any heavy equipment, machinery, or vehicles over the expos ed Heating Cable.
During the blue stone installation process, it is recommended that care be taken to avoid stepping on the hot-cold factory splice portion of cable (green meets black).
It is the responsibility of the electrician to use a 500 VDC megohmmeter and a multi-meter to continuously check on the Heating Cables that are currently being worked on top of, to ensure they have not been damaged, and will be ready for action once the mortar pour has cured.
10. Care must be taken by the blue stone installer so the mortar covers the Heating Cables / Mats and they will not make direct contact with the pavers. We recommend that at least 1.5” (38mm) thick mortar is poured over the Heating Cables / Mats, but no more than 2”(51mm).
11. Theblue stone installer(s) must take care not to walk on the hot-cold factory splice and to avoid damaging the Heating Cables with shovels or rakes. Mats should be placed mesh facing up, keeping the wire-side-down, to help protect them from the shovels.
12. The electrician needs to complete final testing of all the Heating Cables / Mats with a multi-meter and a megohmmeter to verify and record that each Heating Cable has survived the pour of mortar, and is ready for action once the mortar is cured.
Click here to continue reading this article .